Showing posts with label Appetizers. Show all posts

Sunday, June 3, 2012

Onion Strings


Here is a delicious and easy side dish splurge that my family never seems to tire of.  They are SO much better than onion rings any day of the week!  


Onion Strings

1 whole Large Onion
2 cups Buttermilk
2 cups All-purpose Flour
1 Tablespoon (scant) Salt
1/4 teaspoon (to 1/2 Teaspoon) Cayenne Pepper
1 quart (to 2 Quarts) Canola Oil
Black Pepper To Taste

Slice onion very thin. Place in a baking dish and cover with buttermilk and soak for at least an hour.

Combine dry ingredients and set aside.

Heat oil to 375 degrees.

Grab a handful of onions, throw into the flour mixture, tap to shake off excess, and PLUNGE into hot oil. Fry for a few minutes and remove as soon as golden brown.

Repeat until onions are gone.

Serve plain, on salads, burgers, steaks, you name it!

Wednesday, July 27, 2011

Spiral Stuffed Rolls

Here are some delicious rolls that I whipped up after baseball one night last week.  I saw them over at Life as a Lofthouse a while back and I knew they would be a hit here.  The ingredient combination is one that everyone around here loves.  The recipe originated on Mel's Kitchen Cafe (another blog that I love).  Mel's recipe uses homemade bread dough, which I might try next time.  My husband thought the flavor combo was very similar to another recipe we love, Tortellini & Ham, and I agree.  Give these a try!  You will not be disappointed! 

Here are the ingredients you will need.  I subbed chives for the green onions, because they are currently thriving in my herb garden!  The tasted GREAT in there!

Spiral Stuffed Rolls

1 can (13.8 oz) Refrigerated Pizza Dough
6 oz Cream Cheese, softened 
2 Tablespoons Butter, softened
1 cup chopped Ham
3/4 cup finely chopped Broccoli
1 cup shredded Cheese ( I used mild cheddar)
1/4 cup grated Parmesan Cheese
1/2 cup chopped Green Onion

Directions: Unravel dough from can and lay out onto a greased baking sheet. Press dough out into a large rectangle. Preheat oven to 350 degrees.

In a small bowl, cream together the butter and cream cheese. Spread the cream cheese mixture evenly over the dough. Top with chopped ham, broccoli, cheese, Parmesan cheese and green onion. Roll the dough up, pinching the seam to seal. Slice the roll into one inch pieces. You should get about 12 rolls. Place the rolls onto the baking sheet. Bake for 20 minutes, until lightly browned and bubbly.

Thursday, June 16, 2011

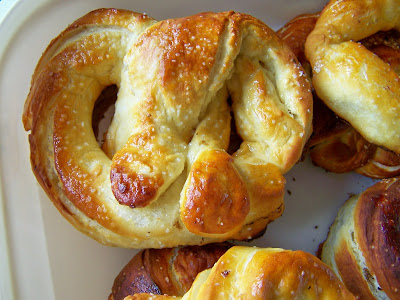
Homemade Soft Pretzels

My kids L~O~V~E pretzels.  OK, so do I {especially jalapeƱo ones like the one pictured below}.  I have been meaning to come up with a recipe we really like for a long time.  Why have I waited so long???  They really are not that complicated and they are SO worth it!  They are actually kind of fun to make!  Get creative and personalize them according to what YOU like!  What would you get yourself if you were actually at the pretzel shop?  Once you have the basic recipe down, it is so easy to do!  


Homemade Soft Pretzels
makes 12 pretzels

4 teaspoons active dry yeast
1 teaspoon white sugar
1 1/4 cups warm water (110 degrees F/45 degrees C)
5 cups all-purpose flour
1/2 cup white sugar
1 1/2 teaspoons salt
1 tablespoon vegetable oil

1/2 cup baking soda
4 cups hot water

4 Tbsp melted butter, for topping
Kosher salt, for topping

In a small bowl, dissolve yeast and 1 teaspoon sugar in warm water. Let stand until creamy, about 10 minutes.

In a large bowl, mix together flour, 1/2 cup sugar, and salt. Make a well in the center; add the oil and yeast mixture. Mix and form into a dough {I use my kitchen aide bread hook which makes my life very easy}. If the mixture is dry, add one or two tablespoons of water. Knead the dough until smooth, about 7 to 8 minutes. 

Lightly oil a large bowl, place the dough in the bowl and turn to coat with oil. Cover with plastic wrap and let rise in a warm place until doubled in size, about 1 hour. {I can never find a good place for dough to rise around here, so I warm the oven to 120-170 degrees, then turn it off.  It is then a perfect environment for dough to rise}.

Preheat oven to 450 degrees F (230 degrees C).

When risen, turn dough out onto a lightly floured surface and divide into 12 equal pieces. Roll each piece into a rope {about 24" long} and twist into a pretzel shape.

 Bring baking soda and water to a boil in a large skillet.  Place pretzels in the boiling solution 2 at a time for about 15-20 seconds.  Remove with a large spatula to a kitchen towel or paper towels to dry the excess water {to prevent the bottoms from burning}.  Place the pretzels on a greased baking sheet. 

Bake in preheated oven for 8 minutes, until browned.

Melt 4 Tbsp. of butter.  As soon as you remove the pretzels from the oven, lightly brush them with butter using a pastry brush.  Immediately sprinkle them with kosher salt.

Enjoy plain or with a dipping sauce of your choice!  Our favorite is cheese sauce!

Variation: Add 1/4-1/3 c. of Jalapenos to the dough for spicy Jalapeno Pretzels!  This is a favorite of mine!  That is what you see in many of the pictures above!  You can get creative and add just about anything your heart desires to the dough!  Don't be afraid to experiment with other toppings too!  Parmesan cheese is a delicious coating instead of the kosher salt!

Tuesday, June 7, 2011

BBQ Pulled Pork Nachos

Hello!  So sorry for the extended absence, I hope you didn't die from missing me!  Things have been crazy around here on many fronts.  It was the end of the school year for my 3 kids, which meant all kinds of craziness, followed by establishing a new summer routine and the start of summer activities.  My oven has also been broken for several weeks, which kind of sapped my joy in the kitchen and made me crave baked goods more than ever.  I did learn how to make chocolate cake in 3 minutes in the microwave though!  Not the same, but will do in a chocolate-craving pinch (of which I have many).

Last, but not least, we have been experiencing flooding here in Bismarck, ND.  The Missouri River has exceeded flood stage and is expected to keep getting worse and stay above flood stage for most all of the summer.  This has resulted in a city-wide sandbagging effort to (hopefully) save the hundreds and hundreds of homes that are expected (and have already been) affected.  The National Guard has been in town building Levey's and dikes to protect many areas of town.  It has been surreal.  If you think of us here, we could certainly use your prayers.

Here is a recipe that I made a few weeks back.  Everyone in my family really enjoyed this unique twist on nachos.  It made for a perfect easy meal after getting home late from the boys' baseball games.  I do think it would be better with my own homemade shredded pork, but I didn't have any on hand.    I plan to freeze a bit next time I make it though with this recipe in mind!  We did individual plates, which worked out well because everyone could build their plates how they wanted.


BBQ Pulled Pork Nachos

1 bag (around 12 oz.) triangle-shaped corn tortilla chips
3 cups shredded Cheddar cheese
1 can (16 oz) chili beans in medium sauce, undrained (I used Bush’s)
1 container (18 oz) refrigerated seasoned shredded pork in original BBQ sauce (I used Curley’s) or about 2 1/4 cup leftover bbq shredded pork
1 lb.creamy-style deli coleslaw, drained or leftover creamy coleslaw, drained (I made my favorite recipe)
2 medium green onions, sliced (2 tablespoons)

Oven Method (party style)
Heat oven to 400°F. Line 12-inch pizza pan or 15x10x1-inch pan with foil; spray with cooking spray. Spread half of chips evenly on pan. Sprinkle 1 cup of the cheese over chips.
In medium bowl, mix together chili beans and pork. Drop half of mixture by small spoonfuls over chips. Repeat layers with chips, cheese and pork mixture.
Bake 12 to 15 minutes or until cheese is melted. Top with coleslaw and green onions. Serve immediately.

Microwave Method (individual plates)
Divide chips between about 5 to 6 plates. Top each plate of chips with about 1/2 cup cheese.
In medium sauce pan, mix together chili beans and pork. Heat over medium heat until heated through.
Microwave each place of chips for about 30 second to 1 minute until cheese is melted.
Top each plate of nachos with about 1/2 cup of the meat/bean mixture followed with some of the coleslaw and green onions. Serve immediately.

Friday, April 29, 2011

Roasted Red Pepper Hummus

Have you tried hummus yet?  If you haven't, let me just say that you really need to.  You see, I resisted for many years, I was more of a creamy/spicy type of Dip Addict (yes, I really am a dip addict, just ask my husband).  Something with a base of beans just sounded too healthy and boring.  Not that I don't strive to eat healthy, I do...sometimes.  Well, this dip is healthy but you would never guess it.  My kids even love it.  We prefer to eat it with pita chips, but it is also good with cut up raw veggies.  

I have attempted to make Roasted Red Pepper Hummus a few times now.  My first couple attempts were OK, but I honestly didn't think they were as good as the vat of Hummus that I like to buy at Sam's Club.  This one though?  Even better!  

I apologize, my camera battery died while making this and then it got eaten too fast so I never got a finished product shot!  Well, actually the food processor shot is of the dip finished, I just wanted a better shot;)

Here is what you will need (minus the apples...apples have nothing to do with this recipe, it was what my kids were eating for snack;):


Roasted Red Pepper Hummus

1 can garbanzo beans (a.k.a. chick peas), drained and rinsed
4oz. roasted red bell pepper (or, even better, roast your own!)
1 tablespoon chopped red onion
2-3 cloves of garlic, minced or pressed
1 Tbsp. tahini
juice of 1 lemon
2 Tbsp. olive oil
1/2 Tbsp. honey
1 tsp. sriracha (or to taste)
scant 1/2 tsp. ground cumin
1/2 – 1 tsp. kosher salt (to taste)
1 tsp. basil

Combine all ingredients in a blender or food processor and process until smooth. You may have to stop to stir and/or scrape down the ingredients a few times.

Serve with Pita Chips &/or fresh cut up veggies.  If you don't devour it all in one day, don't fear, it will keep just fine in the fridge for up to a week.

Souce: ME!


Tuesday, April 26, 2011

Mexican Layer Dip

I have been making this dip for at least 7 years.  I am pretty sure that it is one of my husband's all-time favorites.  I usually reserve it for summer potlucks, but this year, it graced our table at Easter, per my hubby's request.  It is really delicious!  Give it a try!


Mexican Layer Dip

29 oz. can refried beans (or make your own!)
8 oz. sour cream
8 oz. jalapeno chip dip (I use this one from Cass Clay)
8 oz. avacado chip dip
4 oz. can diced green chilies
1 c. taco sauce
4-6 green onions, diced
4 oz. black olives, sliced
6-8 oz. sharp shredded cheddar (always so much more delicious when you buy it in block form and shred it yourself!)
2 Roma Tomatoes, diced

Layer the first 6 ingredients in a 9 x 13 inch baking dish.

Sprinkle on the shredded cheese, onion, black olives, & tomatoes.  

Serve with tortilla chips and enjoy!

Friday, April 22, 2011

Egg Rolls

Happy Earth Day!  On a day like today, I am reminded about how far I have yet to go in being a caring steward of my children's land.  I am thankful that many more people seem to realize that changes need to be made.  I have am always trying to slowly implement positive changes.  This summer, I hope to start composting.  One of my #1 changes that I would personally LOVE to see more people make, is reducing their use of plastic.  Those "convenient" plastic packages and bags are something that, not so conveniently, will stay on this plant long after you yourself are gone {possibly forever in some form}.  I'm not sure there was ever a worse invention.  Do your research on the subject, you will be appalled.  The thing that initially sickened me the most is what it is doing to remote parts of our oceans.  Very scary indeed.  Fortunately, every little change we make helps a little!  Change is a slow process so do 1 positive thing at a time and you will find that being more environmentally friendly isn't hard at all!

Cooking from scratch is not only an environmentally sound practice, but good for your health as well.  While I fully recognize egg rolls are NOT good for me, I also know that these homemade ones pictured below are made with a handful of ingredients that are not actually all that bad.  We have always loved to have egg rolls with our Chinese food but aside from not tasting as good as homemade, all those individual packaged egg rolls sicken me in their little plastic sleeves.  That is the kind of waste that makes my stomach turn, and is one of the many reasons that I avoid the premade freezer foods.

You will find that I DO typically use a couple of convenience items in these egg rolls, namely, bagged coleslaw mix & premade egg roll wraps.  Remember, baby steps.  I am often pressed for time when I am making these and I just don't reasistically have time to make my own egg roll wraps.  I do sometimes buy a head of cabbage instead, it just depends on how much prep time I am going to have.


Delicious & Easy Egg Rolls 

1 pound ground pork
2 teaspoon ground ginger
2 teaspoon garlic powder
1/2 tsp. salt
1/2 tsp. white pepper
1 quart peanut oil for frying
2 tablespoons all-purpose flour 
2 tablespoons water
3 1/2 cups shredded bagged coleslaw mix
10-12 (7 inch square) egg roll wrappers
2 tablespoons sesame seeds (optional)

Season pork with ginger and garlic powder and mix thoroughly. Heat mixture in a medium skillet, stirring, until pork is cooked through and no longer pink. Set aside.

In another large skillet heat oil to about 375 degrees F (190 degrees C) or medium high heat. While oil is heating, combine flour and water in a bowl until they form a paste. In a separate bowl combine the cabbage, carrots and reserved pork mixture. Mix all together.

Lay out one egg roll skin with a corner pointed toward you. Place about a 1/4 to 1/3 cup of the cabbage, carrot and pork mixture on egg roll paper and fold corner up over the mixture. Fold left and right corners toward the center and continue to roll. Brush a bit of the flour paste on the final corner to help seal the egg roll.

 Place egg rolls into heated oil and fry, turning occasionally, until golden brown. Remove from oil and drain on paper towels or rack. Put on serving plate and top with sesame seeds if desired.

One Year Ago:  The Best Banana Bread {I still maintain that this, really is, THE best banana bread}


Saturday, March 12, 2011

Crab Dip

A.K.A. Crab Salad
A.K.A. Crab Spread

Gourmet?  Most certainly not.  Delicious?  No doubt about it.

This recipe originally comes from my mother-in-law.  I have tweaked it a bit, but it is still essentially the same. Whenever I take this to gatherings, I get tons of compliments.  Yes, I know imitation crab is not considered fine dining, but by-golly, people like it in this recipe.  In my book, that is all that matters!

Our favorite way to eat this is atop Club Crackers or Wheat Thins.  Delish!

Here is what you will need!

Crab Dip

1/4-1/2 c. sliced black olives
1 c. diced celery
11/2 c. shredded cheddar
1 tsp. dill weed
1 lb. imitation crab meat, diced
3/4-1 c. Mayo (Hellman's is best)
1/2 c. sliced green onions

Combine all ingredients together.  Either serve immediately, or refrigerate until you are ready to serve!  

Best eaten cold and on Club crackers or Wheat Thins in my opinion!

Wednesday, February 9, 2011

Little Smokies Football Wienies

So, I feel a little weird posting this recipe for a couple of reasons.  First off, doesn't everyone and their dog already have this one is their head?  Secondly, what the he** kind of name is that?  Football Wienies?  Really?  See, I didn't know what to call these, so I had to do some googling and that is what I found.  My kids just ADORE these (which is why I decided to post this after all) but we just call them "Little Smokies".  But...that doesn't work either.  I realize I could call these anything I wanted, but some weird part of me wants to go with Google, so that is what I shall do.


Little Smokies Football Wienies

3 lb. Little Smokies
1 3/4 c. BBQ sauce 
1 3/4 c. Grape Jelly

Combine the BBQ sauce and grape jelly in a small slow cooker.  Stir in the little smokies.  Cook on low for at least 2 hours, or until the smokies are nice and hot.  

*Note: I bought this big bag of Smokies at Sam's Club.  You can easily half this recipe with a smaller bag like those sold at the grocery store.  

Monday, February 7, 2011

Broccoli Cheese Dip

As someone that posted recently about the benefits of making my own bread, I am a little embarrassed to post this recipe.  The fact is, every once and a while, we all just have to treat ourselves to some good old-fashioned comfort food.  For me, this is just that.  I grew up eating this dip at A&B Pizza (long since closed down) in my hometown of Dickinson.  Some weekend nights, my dad would order in, broccoli dip and pepperoni and green olive pizza.  The pizza was cut in squares, which I loved.  It meant I could go for the middle slices and avoid eating any of the dreaded crust.  My favorite though, was to eat at A&B so that I could hit the roller rink that was attached to the pizza place after, often capping the night off with a giant pickle.  Oh, the joys of childhood.

When I first moved to Bismarck, I was OVERJOYED!  There was an A&B Pizza, right here in town!  Much to my dismay, they had no clue what I was talking about when I tried to order Broccoli Dip.  I called my dad and vented my frustrations.  Not long after, he ran in to the old owner of the Dickinson A&B who graciously shared his personal recipe for Broccoli Dip.  So, so simple.  So, so yummy.  


Broccoli Cheese Dip

1 lb. American cheese slices, cubed (NOT Velveeta, you may want to get it without the pesky wrappers)
10 oz. chopped frozen broccoli florets (you used to be able to find 10 oz. boxes of frozen chopped broccoli, but you can't anymore.  I let them partially thaw and give them a rough chop myself.)
1 can mushrooms, undrained
1 can cream of mushroom soup

Combine all ingredients in a small slow cooker and warm, stirring occasionally, until it is all melted.

Serve with tortilla chips.  I prefer the yellow kind with this dip.  I don't remember if that is the kind A&B served, but my taste buds tell me it is so.

In My Cooking Diary One Year Ago: Calico Beans

Monday, January 17, 2011

Ham & Cheese Sliders {With a Tasty Twist}

Do you need a quick weeknight dinner on a hearty appetizer for a get together?  If so, these are PERFECT.  I have made them several times and I just love them.  I have seen them posted on many food blogs and I know there is good reason for that!  These take a simple sandwich and transform them into something special with an easy sauce that tastes spectacular.  I have seen these sandwiches SO many places.  I think the first time was in a magazine years back...maybe Taste of Home or Quick Cooking? I have recently seen them on allrecipes, Tasty Kitchen, and a favorite blog of mine, The Girl Who Ate Everything.  Give them a try!


Ham & Cheese Sliders

24 good white dinner rolls (I prefer to use King Hawaiian Rolls, they really add another flavor dimension)
24 pieces good honey ham

24 small slices Swiss cheese (I sometimes do half Swiss, half sharp cheddar & both are delicious)

1/3 cup mayonnaise

1/3 cup miracle whip


Poppy seed sauce

1 T poppy seeds

1 1/2 T yellow mustard

1 stick butter, melted
1 T minced onion 
1/2 tsp. Worcestershire sauce


In a small bowl, mix together mayonnaise and miracle whip. Spread lightly onto both sides of the center of each roll. Place a slice of ham and a slice of Swiss inside of each roll. Close rolls and place them into a large baking dish or heavy cookie sheet. Place very close together.


In a medium bowl, whisk together all of the poppy seed sauce ingredients. Pour evenly over all of the sandwiches. Let sit 10 minutes or until butter sets slightly. Cover with foil and bake at 350 degrees for 12-15 minutes or until cheese is melted. Uncover and cook for 2 additional minutes. Serve warm.


** sandwiches can be assembled a day ahead and kept in the fridge ready to bake.

Friday, December 3, 2010

Smoky Sesame Cheese Log

Today is your lucky day.  I am sharing my families absolute FAVORITE Thanksgiving appetizer.  I stumbled upon this recipe about 8 years ago in a Taste of Home magazine and I have been making it for Thanksgiving ever since.  It is, of course, also perfect as a Christmas appetizer.  We are usually doing a lot of traveling at Christmas though, so I don't get to do much of the cooking.  Enjoy!


Smoky Sesame Cheese Log

2-8 oz. packages Cream Cheese, softened (reduced-fat is fine, that is what I usually use)
1 c. (4 oz.) Monterey Jack cheese (I have also used Sharp Cheddar in a pinch and I think we might like that even better)
1/2 c. Bacon, cooked & crumbled
2 Tbsp. Sesame Seeds, toasted
2 Tbsp. Worcestershire sauce
1 tsp. Liquid Smoke

Topping Ingredients:
1/2 c. Bacon, crumbled & cooked
1/2 c. Sesame Seeds, toasted
1 Tbsp. Chives, minced

Assorted Fresh Vegetables or Crackers

In a large bowl, beat the first five ingredients until blended.  Add liquid smoke.  Shape mixture into a log.  Cover and refrigerate for 8 hours or overnight ( I sometimes speed up this process by just popping it in the freezer for 30 minutes or so before rolling it).  

For topping, combine the bacon, sesame seeds, and chives; roll cheese log in topping.  Serve with vegetables and/or crackers.

FYI: I usually use an entire 1 lb. package of bacon in this recipe (minus the couple slices that inevitably get stolen by my family while I am trying to cook;)


Saturday, November 13, 2010

Baked Creamy Chicken Taquitos

Yesterday, I was really on a roll.  I got the carpets and furniture shampooed and I cooked and baked up a storm.  I am so glad that I finally got some photos of these Chicken Taquitos.  We have had them before, and they are a hit with my entire family.  Back in college, I LOVED El Monterey Chicken & Cheese Taquitos and I think these taste SO much like them.  Except better, because I know they are much healthier:)

Here is what you will need to get rolling:)  I also did a little step-by-step in pictures this time.

Baked Creamy Chicken Taquitos

1/3 c. (3 oz) cream cheese (I use reduced-fat)
1/4 c. green salsa
1 Tbsp. fresh lime juice 
1/2 tsp. cumin
1 tsp. chili powder
1/2 tsp. onion powder
1/4 tsp. granulated garlic, or garlic powder
3 Tbsp. chopped cilantro
2 Tbsp. sliced green onions
2 c. shredded cooked chicken (I like to boil mine for this recipe)
1 c. Pepper jack cheese, shredded
12 Flour Tortillas (soft taco size)-you can make less or more depending on how much filling you like in yours. I like mine nice and thin.
Kosher Salt
Cooking Spray

Heat oven to 425*  Lightly coat baking sheet with nonstick spray.  

Heat cream cheese in the microwave for 20-30 seconds so it is soft and easy to stir.  Add green salsa, lime juice, cumin, chili powder, onion powder, and garlic.  Stir to combine, then add cilantro and green onions.  Add chicken and cheese and combine well.

You can prepare up to this step ahead of time, just store the mixture in the fridge.

Wrap tortillas in a damp paper towel and microwave until warmed and soft enough to easily work with.  If I am doing all 12, I do 45-60 seconds.  

Lay all the tortillas out and equally distribute the chicken mixture amongst them on the lower 1/3 of the tortilla, about 1/2 in. from the edge.  Remember to work quickly so that your tortillas don't cool and start to crack.  If they do, you can repeat the microwave/wet paper towel technique.    

Roll it up as tightly as you can.  

Place seam side down on a baking dish.  Lay all the taquitos seam side down and make sure they are not touching each other.  Spray the tops lightly with cooking spray or an oil mister, and sprinkle some kosher salt on top.  

Place pan in oven and bake for 15-20 minutes or until crisp and the edges start to get golden brown.  

Dip them in salsa, sour cream, or guacamole.  

Enjoy!

Friday, September 10, 2010

Stuffed Pizza Rolls

I was just browsing through some photos from last month and I found the photos of these Stuffed Pizza Rolls. I can't believe I forgot to post them!  I made them one day for my kids for lunch.  My kids are forever wanting me to buy the prepackaged pizza rolls, but I know those are so incredibly bad for them.  These might not be health food exactly, but I feel much better about serving them.  I think that they taste oh so much better too.

Here is what you will need:


Stuffed Pizza Rolls

1 roll Refrigerated Pizza Crust (thin crust)
Mozzarella Cheese, shredded
Pizza Toppings of you choice- I kept it simple this time with just pepperoni that I diced up per my childrens' request
1 Tbsp. Olive Oil
1/2 tsp. Garlic Powder
1 tsp. Italian Seasoning
2 Tbsp. Grated Parmesan Cheese
Warmed Marinara or Pizza Sauce, for dipping (I used my homemade pizza sauce)

Preheat oven according to refrigerated crust instructions, usually 400 degrees.  

Unroll your pizza dough onto a lightly floured surface.  Pat or roll the dough so it is about 12" by 8".  You are going to want to cut it into 24 squares, so just eyeball it if you need to.  Use a pizza cutter to slice the dough into 24 squares.

Place cheese and desired toppings on each square, just eyeball how much.  Keep in mind that you will need to be able to enclose the toppings in the dough.  Note: Do not put pizza sauce on squares!  It is for dipping!

When all of your dough squares have cheese and toppings on them, carefully life up each square and wrap the dough around the toppings.  Pinch to make sure that each ball is sealed shut and then place them, seam side down, in a lightly sprayed pie pan (or similar sized dish).  

Using a pastry brush, brush the tops of the rolls lightly with Olive Oil and then sprinkle with the garlic and Italian seasoning and top with the Parmesan cheese.  

Bake in the oven for 15-20 minutes or until golden brown on top.  Keep an eye on them!  Doughs vary, so you might even want to check them after 10 minutes.  

Serve warm with pizza sauce on the side for dipping.  

Enjoy!      


Monday, August 23, 2010

Spinach & Artichoke Dip


Last night I finally got around to trying out this delicious Spinach & Artichoke dip recipe.  It comes from a great friend, who is also a great cook.  With the start of football season, I am sure I will be making it again very soon.  We love to have delicious appetizers handy for those lazy football-watching Sundays.

Here is what you will need to get started.  I actually ended up adding basil to mine, but that is purely optional.  I liked the flavor of basil in this dip, but the original recipe does not call for it and it is still extremely good.  I guess it all depends if you are a lover of basil:)


Spinach & Artichoke Dip

3-6 oz. jars of marinated artichoke hearts, drained & coarsely chopped
10 oz. frozen spinach, thawed, water squeezed out
8 oz. cream cheese, softened (reduced-fat is fine)
1/3 c. grated Parmesan (I think I actually added 1/2 c.)
1/4 c. sour cream (light is fine)
1/4 c. mayonnaise (light is fine)
1/2 tsp. red pepper flakes
1/4 tsp. salt
1/2 tsp. garlic powder
1/2-1 tsp. basil, optional

Place all ingredients in a small slow cooker.  Heat on high for an hour, or low for longer, stirring as it heats up to combine the ingredients.  

Serve hot, with pita chips, crackers, or whatever you like!  Although you *can* substitute regular canned artichoke hearts, I think the marinated ones make this dip something special, so I don't recommend it.  

Source: My fab friend, Jen


Monday, August 9, 2010

Sicilian Butter

WARNING: If you are not a garlic lover, run away now.  This recipe IS NOT for you.  However, if you are, you are home.  Keep reading, cause you will love this, baby.


Sicilian Butter

8 cloves garlic (about 1/2 a head), or to taste, minced
1 1/4 c. high quality, extra-virgin olive oil
2-3 pinches salt
1/2 c. finely grated Parmesan
2 pinches red chili flakes (optional)
2 tsp. chopped, fresh, basil

Whisk all ingredients together, except basil.  Let the mixture sit on the counter for a few hours in a covered container to allow the flavors to meld.  

Right before serving, add the chopped basil.  

Serve the Sicilian Butter in a shallow dish with Crusty bread.

Note: When I am making this for my family, I typically cut it in half.

Thursday, June 24, 2010

Bacon-Wrapped Jalapeno Poppers

Hi all!  This is my first post as a woman in her 30's!  I celebrated my 30th yesterday with my wonderful family.  Do you think my husband bought a big enough cake for the 5 of us?  As you can see, he forgot candles but he got creative and lit a 3-wick candle for me to blow out.  

I know I have been a terrible blogger, but if you make these, I think you will forgive me.  So simple, so delicious.  They make a great summertime appetizer.  They are also SO yummy plopped on a burger.  Mmmmm!

My picture didn't turn out the best.  My camera was in need of new batteries and I was in a rush to...umm....eat these....

Bacon-Wrapped Jalapeno Poppers

1 lb. thin (regular) bacon, sliced into thirds
2 (16 oz) cubes cream cheese (softened)- I always use reduced fat
20 whole, fresh jalapenos (2-3 inches is best)

If you have them, you may want to wear latex gloves to prep the peppers.  There is nothing worse forgetting and rubbing your eyes.  Ouch!  

Cut jalapenos in half, length-wise.  With a spoon removed the seeds and white membrane (the source of the heat, leave a few if you want 'em nice and spicy!)  


Smear softened cream cheese into each jalapeno half.  Wrap jalapeno with bacon piece (1/3 slice).  Secure by sticking toothpick through the middle.  (At this point, you can freeze them, uncooked, in a Ziploc bag for later use.)

Bake on a pan with a rack in a 375 degree oven for 20-25 minutes.  You don't want the bacon to shrink so much it squeezes the jalapeno.  If, after 20 minutes, the bacon doesn't look brown enough, just turn on the broiler for a couple of minutes to finish them off.  These are best when the jalapeno still has a bit of bite to it.  

Serve immediately, or they are also great at room temperature.  

Monday, January 25, 2010

'Bootylicious' Buffalo Chicken Dip

Let me just start by saying, last night was a sad, sad night.  At least, it was if you are a Vikings fan.  This household was so excited for the game.  We made sure we got homework/chores done so we could spend our evening on the couch cheering for the Vikes.  I made this wonderful Buffalo Chicken Dip to munch on during the game, which I will be sharing shortly.  Then, we discover that we, for the first time EVER.  Are.  Not.  Getting.  Fox.  ARGH!  The hubby quickly runs to Wally World to buy a new outdoor antenna.  Still.  Does.  Not.  Work.  Hubby calls our local Fox and finds out that ice took down their tower and it won't be repaired until Monday.  MONDAY?!?!  Don't these people know we have a Very Important Football Game to watch? 


We didn't mess around, we ditched my game snacks and headed to Buffalo Wild Wings with our 3 kids in tow to watch the game.  (And yes, the hubby called ahead to make sure THEY were getting the game.)  By the time we got there, the game was a few minutes into the first period and we had to sit and wait to be seated for a bit.  We didn't care though, we had a nice big screen in the waiting area:)  We enjoyed drinking our beer, eating our wings, and watching the game.  At least until the fumbles started UGH!  We did end up having to head home in the 4th quarter (a certain 4 year old got a little antsy) and we had to finish listening to the game on the radio.  Last night was a sad night, but in the light of a new day, I can say that I am happy that they had such a good season, maybe it will work out for us next year.  


Enough football talk, onto the football munchies.  The football munchies that I still have sitting in my fridge, mostly uneaten;p  I'm sure most of you have heard of this popular dip, but I do love this version the most (and I have tried a few).  It is prettier if you layer it in a baking dish and bake it, but not nearly as convenient.  I apologize for the pic, it is much better than it looks!       


Bootylicious Buffalo Chicken Dip

20 oz. Boneless, skinless chicken breasts (I used 2 breasts)
pinch seasoning salt
pinch garlic powder
16 oz. cream cheese (I use Neufchatel, which is lower in fat/calories and we can't tell the difference)
1 c. ranch or bleu cheese dressing (In my opinion, bleu cheese is a must, but I like bleu cheese)
1 c. Frank's hot sauce
1 1/2 c. sharp cheddar, shredded
Celery, Crackers, or Chips for dipping- we prefer tortilla chips around here

Fill saucepan with water, add a pinch of seasoning salt, a pinch of garlic powder, and chicken breasts. Boil until chicken is done. Drain, allow to cool, and shred with forks. (You can skip this step and use 2 10 oz. cans of chicken instead if you prefer.) 


Return shredded chicken to pan, add in hot sauce. Heat over medium heat until heated through. Stir in cream cheese and ranch/blue cheese dressing. Cook, stirring until well blended and warm. Mix in half of the cheddar cheese. *Very important step: You must now sample it to make sure it’s got enough buffalo kick; add more hot sauce as needed. You want it to taste more buffalo than chicken.) 


Transfer to a crock pot. Sprinkle remaining cheese on top (I just mixed all the cheese in so it would be evenly distributed), cover and cook on low until hot and bubbly. Serve with celery sticks, crackers, or tortilla chips.


Found this particular version on Tasty Kitchen, the Pioneer Woman's awesome recipe sharing site!

Monday, January 11, 2010

Buffalo Wild Wing Night at Home

           My family LOVES Buffalo Wild Wings.  One thing I DON'T love is spending $75 on one meal (yes, that price includes a couple of beers each for the hubby and I.  Who can have wings without beer?).  So...we just don't get to go out to eat as often as we would like.  I guess that is one of the drawbacks of being a stay-at-home-mom.  When we originally cut back on our dining out, I won't lie, it was hard and I really missed it.  Now, I have started to have fun with it.  Funnily enough, many of our restraunt favorites are actually very easy to make at home.

For both of the sauce recipes below, we used popcorn chicken.  The ones I used were the Member's Mark brand from Sam's Club, which are very good and almost exactly like the boneless wing pieces at BWW.  We do deep fry our chicken just like BWW's does, but I do think you could get away with baking it if you wanted to save some calories.  We don't have these very often, so we go all out when we do;P

Sweet and Spicy Wing Sauce is a tried and true recipe we have been making for awhile now.  It is a bit spicy, but it is mild enough that all 3 of my kids will eat it.  It also has a sweetness to it from the honey that is irresistable.  This sauce is not actually a BWW copycat recipe, but it is at least as good as many of their best sauces.


Sweet & Spicy Wing Sauce

1/2 c. Ketchup
1/3 c. Frank's Hot Pepper Sauce
1/2 c. butter
2 Tbsp. honey

Combine the butter, hot sauce, ketchup, and honey in a small saucepan.  Bring to a boil over medium-high heat.  Reduce heat to low and simmer for 15 minutes.

Pour over popcorn chicken or wings in bowl and toss.

Serve with Bleu Cheese dressing for dipping!

The next sauce recipe I would like to share is for Spicy Garlic Sauce.  Let me just say, it is AWESOME.  It really is just like the real thing that they serve at Buffalo Wild Wings.

                                                         
Spicy Garlic Wing Sauce

1 c. Frank's Hot Pepper Sauce
1/3 c. canola oil
1 tsp. sugar
1 tsp. garlic powder
1 tsp. coarse ground black pepper
1/2 tsp. cayenne pepper
1/2 tsp. Worchestershire sauce
1 egg yoke
2 tsp. water
2 tsp. cornstarch

Combine all ingredients except egg yolk, water, and cornstarch in a small saucepan.  Heat sauce over medium heat until boiling, then reduce heat and simmer for 5 minutes.  Remove pan from heat and allow it to cool, uncovered, for 10 minutes.

While sauce cools, vigorously whisk egg yolk with 2 tsp. water in a medium bowl for about 2 minutes or until the color is a pale yellow.  Whisk in cornstarch until disolved.  Drizzle sauce mixture into egg yolk mixture in a steady stream while rapidly whisking.  Now you should have a nice, thick creamy sauce!  If you aren't ready to make yours wings, just pop in the fridge and store until needed!


Pour over popcorn chicken or wings in bowl and toss.

Serve with Bleu Cheese dressing for dipping!


Now I just need to learn how to make Mango Habanero Wings!  Yum!  Those are my new favorite thing to have at Buffalo Wild Wings.  When I made the above recipes, I also made Buffalo Chips.  I will have to share the recipe for those soon!

LinkWithin

Related Posts with Thumbnails