Friday, April 29, 2011

Roasted Red Pepper Hummus

Have you tried hummus yet?  If you haven't, let me just say that you really need to.  You see, I resisted for many years, I was more of a creamy/spicy type of Dip Addict (yes, I really am a dip addict, just ask my husband).  Something with a base of beans just sounded too healthy and boring.  Not that I don't strive to eat healthy, I do...sometimes.  Well, this dip is healthy but you would never guess it.  My kids even love it.  We prefer to eat it with pita chips, but it is also good with cut up raw veggies.  

I have attempted to make Roasted Red Pepper Hummus a few times now.  My first couple attempts were OK, but I honestly didn't think they were as good as the vat of Hummus that I like to buy at Sam's Club.  This one though?  Even better!  

I apologize, my camera battery died while making this and then it got eaten too fast so I never got a finished product shot!  Well, actually the food processor shot is of the dip finished, I just wanted a better shot;)

Here is what you will need (minus the apples...apples have nothing to do with this recipe, it was what my kids were eating for snack;):


Roasted Red Pepper Hummus

1 can garbanzo beans (a.k.a. chick peas), drained and rinsed
4oz. roasted red bell pepper (or, even better, roast your own!)
1 tablespoon chopped red onion
2-3 cloves of garlic, minced or pressed
1 Tbsp. tahini
juice of 1 lemon
2 Tbsp. olive oil
1/2 Tbsp. honey
1 tsp. sriracha (or to taste)
scant 1/2 tsp. ground cumin
1/2 – 1 tsp. kosher salt (to taste)
1 tsp. basil

Combine all ingredients in a blender or food processor and process until smooth. You may have to stop to stir and/or scrape down the ingredients a few times.

Serve with Pita Chips &/or fresh cut up veggies.  If you don't devour it all in one day, don't fear, it will keep just fine in the fridge for up to a week.

Souce: ME!


Thursday, April 28, 2011

Grownup Mac & Cheese

Last night, I made one of the best macaroni and cheese recipes that I have ever eaten.  Seriously.  One of my best friends posted this recipe in her facebook notes ages ago, along with lots of other deliciousness.  Every once and awhile, when I think of it, I page through her notes and steal her fantastic recipes;)  I'm not sure why I haven't made this one before, but I am glad that I found it.  I will say, my kids weren't as big of fans of this as the adults were.  I also say that their opinions don't count though, since all they really want me to do is start buying Kraft Mac & Cheese again and it is the standard against which they judge all others.  Enjoy & THANK YOU Jen!

Here is what you will need


Please note that I doubled this recipe for my family.  The pictures above are of the doubled recipe.  

Grownup Mac & Cheese

8 oz. cavatappi (can use macaroni)- I used mini Penne
3 1/2 Tbs. butter (divided)
1/4 cup finely chopped shallots
2 Tbs. flour
1/2 cup dry white wine
3/4 cup chicken broth
2/3 cup heavy whipping cream
7 oz. grated gruyere (I used Fontina which was delicious also)
3 oz. grated aged gouda, smoked gouda or romano (I went with smoked gouda...because I'm obsessed with it)
2 Tbs. minced fresh chives
1 Tbs. Dijon mustard
1/2 tsp. coarse salt (divided)
1/8 tsp. cayenne (more if you like it spicy!)
1/4 tsp. nutmeg
4 oz. (1/4 loaf) crusty sourdough bread, torn into large pieces

Preheat oven to 400.

Cook pasta until al dente in salted water, drain but do not rinse.

In large frypan, melt 2 Tbs. of the butter over medium-high heat. Add the shallots and cook until they're light golden - about 3 minutes. Sprinkle in the flour and cook & stir another minute. Add wine & broth, then cook & stir, scraping up the yummy browned bits. Add cream, stir well. Add the grated cheeses, one handful at a time, stirring each handful until melted. Stir in the chives, mustard, 1/4 tsp. of the salt, the cayenne & nutmeg. Stir pasta into this mixture, and dump it all into a 2-qt. baking dish.

Place the broken sourdough pieces, the remaining 1 1/2 Tbs. butter and the remaining 1/4 tsp. salt into a food processor. Pulse until it becomes coarse crumbs. Sprinkle this on top of the pasta, pop it into the oven, and bake 20 minutes until bread is lightly brown & crunchy and cheese is bubbly.

Serves 6

Source: Jen P.

Wednesday, April 27, 2011

Chocolate Eclair Cake


Let me just say that this cake pictured above may look innocent, but it is actually very dangerous.  This may be one of the easiest desserts that I have even made.  Combine that with how incredibly delicious it is, and I think I may have a problem.  I am not going to tell you how many pieces of the cake that I had because I am moving on with my life.  That said, you can choose to make this cake lighter by using reduced-fat or fat-free milk and whipped topping.  That way, your frosting is the only big offense;)  The only change I might make next time is to use a homemade frosting.  I am kind of partial to this one that I like to frost cupcakes with.  In my opinion, canned frosting just isn't as good.  If you want to keep it simple though, go ahead and use canned, it is still delicious!  This was one of MANY dishes that I made for Easter so I was glad to keep this one simple this time around!


Chocolate Eclair Cake

2 (3.5 ounce) packages instant vanilla pudding mix
1 (8 ounce) container frozen whipped topping, thawed
3 cups milk
1 (16 ounce) package graham cracker squares
1 (16 ounce) package prepared chocolate frosting

In a medium bowl, thoroughly blend the pudding mix, whipped topping, and milk.

Arrange a single layer of graham cracker squares in the bottom of a 13x9 inch baking pan. Evenly spread half of the pudding mixture over the crackers. Top with another layer of crackers and the remaining pudding mixture. Top with a final layer of graham crackers.

Spread the frosting over the whole cake up to the edges of the pan.  The frosting will be easier to spread if the cake is covered and chilled for about 30 minutes before spreading. Cover, and chill at least 4 hours before serving, but preferably overnight so that the graham crackers really get a chance to soften.

Source: allrecipes.com

Tuesday, April 26, 2011

Facebook

Hi!  Are any of you on facebook?  If so, take a minute and "like" Diary of a Recipe Addict!  I want to get a button for it on my blog, but I haven't figured that out yet;)  I am not the most technologically savvy person & I want to give it another go before I start bugging my live in IT guy (my husband).

Thank you so much to everyone that reads my blog!  I love you guys!

May Menu Plan

Here is my May menu plan, a bit early!  I am home today with a sick kiddo, so I am taking the opportunity to get ahead.  As always, when I do my monthly plan, it is fairly general.  I tend to cover all the main dishes for the month and a few extras.  I am basically getting the "big" job done & I typically can get my main dishes shopped for.  If I think of other things, I add them in to my weekly menu plan that I make before my weekly 'quick' trip to the store.  This is when I generally decide on our veggies and side dishes since I generally like to get what looks good & fresh and what is on sale.  

People are always surprised/impressed that I do this monthly plan, but the truth is, it makes my life very simple throughout the month.  I generally have what I need in my house to make 1 months worth of meals (aside from perishables shopped for weekly).  Therefore, I am never left stuck at 5 o'clock realizing I have no clue what to make and I don't have the ingredients I need anyway.  This is a guide, I often change things up depending on how much time I have on a particular day for dinner preparation and what we are in the mood for or skip it all together if I feel we have too many leftovers that need to be eaten.  I then just carry some of the meals over into the next month.  

Many of these recipes are linked to places outside of my own personal blog.  Some of the recipes I will follow exactly and others are mainly inspiration and I will change the recipe up according to our tastes and desires.  As I go, I try to get my favorites up on my blog along with any changes I made. 

1st:   Chicken MakhaniNaan, Basmati Rice


6th:  My Very Favorite Homemade Pizza Crust & Assorted Toppings


13th:  The Best Taco Meat & Homemade Shells


17th:  Homemade Shake and Bake Pork Chops


20th:  My Very Favorite Homemade Pizza Crust & Assorted Toppings


24th:  Baked Scallops (with some changes from last time) over Pasta


27th:  The Best Taco Meat & Homemade Shells


Breakfast:


Mexican Layer Dip

I have been making this dip for at least 7 years.  I am pretty sure that it is one of my husband's all-time favorites.  I usually reserve it for summer potlucks, but this year, it graced our table at Easter, per my hubby's request.  It is really delicious!  Give it a try!


Mexican Layer Dip

29 oz. can refried beans (or make your own!)
8 oz. sour cream
8 oz. jalapeno chip dip (I use this one from Cass Clay)
8 oz. avacado chip dip
4 oz. can diced green chilies
1 c. taco sauce
4-6 green onions, diced
4 oz. black olives, sliced
6-8 oz. sharp shredded cheddar (always so much more delicious when you buy it in block form and shred it yourself!)
2 Roma Tomatoes, diced

Layer the first 6 ingredients in a 9 x 13 inch baking dish.

Sprinkle on the shredded cheese, onion, black olives, & tomatoes.  

Serve with tortilla chips and enjoy!

Sunday, April 24, 2011

Menu Plan Monday

Monday:  Spicy Soba Noodles with Chicken in Peanut Sauce

Tuesday:  Spaghetti Braid

Wednesday:  Grownup Mac & Cheese & Side Salad

Thursday:  Leftovers

Friday:  The Best Taco Meat, Homemade Crisp Taco Shells, Assorted Toppings

Saturday:  BWW Night at home & Onion Strings

Sunday:  Chicken MakhaniNaan, Basmati Rice

Friday, April 22, 2011

Egg Rolls

Happy Earth Day!  On a day like today, I am reminded about how far I have yet to go in being a caring steward of my children's land.  I am thankful that many more people seem to realize that changes need to be made.  I have am always trying to slowly implement positive changes.  This summer, I hope to start composting.  One of my #1 changes that I would personally LOVE to see more people make, is reducing their use of plastic.  Those "convenient" plastic packages and bags are something that, not so conveniently, will stay on this plant long after you yourself are gone {possibly forever in some form}.  I'm not sure there was ever a worse invention.  Do your research on the subject, you will be appalled.  The thing that initially sickened me the most is what it is doing to remote parts of our oceans.  Very scary indeed.  Fortunately, every little change we make helps a little!  Change is a slow process so do 1 positive thing at a time and you will find that being more environmentally friendly isn't hard at all!

Cooking from scratch is not only an environmentally sound practice, but good for your health as well.  While I fully recognize egg rolls are NOT good for me, I also know that these homemade ones pictured below are made with a handful of ingredients that are not actually all that bad.  We have always loved to have egg rolls with our Chinese food but aside from not tasting as good as homemade, all those individual packaged egg rolls sicken me in their little plastic sleeves.  That is the kind of waste that makes my stomach turn, and is one of the many reasons that I avoid the premade freezer foods.

You will find that I DO typically use a couple of convenience items in these egg rolls, namely, bagged coleslaw mix & premade egg roll wraps.  Remember, baby steps.  I am often pressed for time when I am making these and I just don't reasistically have time to make my own egg roll wraps.  I do sometimes buy a head of cabbage instead, it just depends on how much prep time I am going to have.


Delicious & Easy Egg Rolls 

1 pound ground pork
2 teaspoon ground ginger
2 teaspoon garlic powder
1/2 tsp. salt
1/2 tsp. white pepper
1 quart peanut oil for frying
2 tablespoons all-purpose flour 
2 tablespoons water
3 1/2 cups shredded bagged coleslaw mix
10-12 (7 inch square) egg roll wrappers
2 tablespoons sesame seeds (optional)

Season pork with ginger and garlic powder and mix thoroughly. Heat mixture in a medium skillet, stirring, until pork is cooked through and no longer pink. Set aside.

In another large skillet heat oil to about 375 degrees F (190 degrees C) or medium high heat. While oil is heating, combine flour and water in a bowl until they form a paste. In a separate bowl combine the cabbage, carrots and reserved pork mixture. Mix all together.

Lay out one egg roll skin with a corner pointed toward you. Place about a 1/4 to 1/3 cup of the cabbage, carrot and pork mixture on egg roll paper and fold corner up over the mixture. Fold left and right corners toward the center and continue to roll. Brush a bit of the flour paste on the final corner to help seal the egg roll.

 Place egg rolls into heated oil and fry, turning occasionally, until golden brown. Remove from oil and drain on paper towels or rack. Put on serving plate and top with sesame seeds if desired.

One Year Ago:  The Best Banana Bread {I still maintain that this, really is, THE best banana bread}


Thursday, April 21, 2011

Simply Perfect Enchiladas


Guess what?!  I have THE most exciting news!  IT'S NOT SNOWING TODAY!!!  Do you not find this news thrilling?  Oh... you must not live in North Dakota.  It is, however, overcast, cool, and rainy.  No biggie though!  No more snowflakes is enough for me:)  I would, however like sunshine....SOON.  I have been craving the sun more than chocolate and THAT, my friends, is saying something.

I know that SOME people are probably enjoying themselves in their backyards grilling, but here in the North we need to make due.  This weekend I make the most delicious enchiladas, really you must try them.  They were slightly more work than many other recipes I have tried but they were oh-so-worth-it.  I also made homemade refried beans in the crockpot (recipe coming soon) and Mexican rice with them.  YUM.  I am also having a tough time fitting into my carpi's for summer and I have NO idea why.  I mean, I work out 5 days a week, shouldn't I automatically get to be thin?  Life is so unfair.

Here is what you will need...minus the bananas-who-have-seen-better-days, stuffed dog, and pile 'o magazines.


My plate YUM. Make sure you add a dollop of sour cream on top which I remembered to do only after I had started in on these babies.  It takes it over the top.

Enchiladas

FOR THE SAUCE:
1 Tablespoon Canola Oil
1 Tablespoon All-purpose Flour
1 can (28 Ounce) Enchilada Or Red Sauce
2 cups Chicken Broth
½ teaspoons Salt
½ teaspoons Ground Black Pepper
2 Tablespoons Chopped Cilantro
_____
FOR THE MEAT:
1-½ pound Ground Beef
1 whole Medium Onion, Finely Diced
2 cans (4 Ounce) Diced Green Chilies
½ teaspoons Salt
_____
FOR THE TORTILLAS:
10 whole (to 14) Corn Tortillas
½ cups Canola Oil
_____
TO ASSEMBLE:
3 cups Grated Sharp Cheddar Cheese
½ cups Chopped Black Olives
1 cup Chopped Green Onions
½ cups Chopped Cilantro
Preparation Instructions

Step #1 – The Sauce
In a large saucepan over medium heat, add oil and flour and whisk together to make a paste, cooking for one minute. Pour in the red sauce, chicken broth, cilantro, salt and pepper. Bring to a boil. Reduce heat and simmer 30-45 minutes.

Step #2 – The Meat
Brown the meat with onions in a skillet. Drain off fat. Stir in 2 cans diced green chilies and seasoned salt. Set aside.

Step #3 – Tortillas
Heat canola oil in a small skillet over medium heat. One by one, using tongs, fry tortillas in oil until soft, not crisp – about 30 seconds per side. Remove to a paper—towel lined plate. Repeat until all tortillas have been fried.

Step #4 – Assembly
Preheat oven to 350 degrees. Pour ½ cup red sauce in bottom of baking pan. Spread to even out. Dip each tortilla into red sauce, then remove to work surface. Spoon meat, a little grated cheese, a little black olives, and green onions in the center of tortilla. Roll up and place, seam down, in baking pan. Repeat until pan is filled. Pour extra red sauce over enchiladas. Top with remaining cheddar cheese.

Bake for 20 minutes or until bubbly. Sprinkle cilantro over enchiladas before serving.


Tuesday, April 19, 2011

Three-Pepper Beef


First off, I want to apologize because I have been terrible about posting recipes of late.  All you are getting from me these days is a menu plan with the very occasional recipe thrown in.  I have been feeling BLAH, I must admit.  The snowy spring we are having in ND is taking it's toll on my mental state;)

This month, I lost my dear aunt to cancer after a courageous 12 year battle. She was a beautiful, fun-loving person and she is going to be sorely missed.  A year ago, she gave me a recipe book with some of her favorite recipes.  When it came to cooking, canning, and fun recipe ideas, we were kindred spirits.  I have been enjoying paging through the recipe book and I can't wait to share some of her recipes on my blog.

In the meantime, here is a fabulous, easy, and even HEALTHY stir-fry that I made recently.  With the multi-colored vibrant peppers, it was a truly beautiful dish that everyone in my family seemed to really enjoy.

Here is what you will need:


Three-Pepper Beef 

2 1/2 teaspoons cornstarch, divided
1 teaspoon sugar, divided
1/2 teaspoon salt
1 pound flank steak, trimmed and thinly sliced across the grain
1/4 cup low-salt beef broth
3 tablespoons low-sodium soy sauce
1 teaspoon freshly ground black pepper
1 teaspoon vegetable oil
1/4 cup thinly sliced green onions
1 teaspoon minced peeled fresh ginger
1 garlic clove, minced
1 cup sugar snap peas, trimmed
1 1/4 cups cubed red bell pepper
1 1/4 cups cubed yellow bell pepper
1 1/4 cups cubed green bell pepper


Combine 1/2 teaspoon cornstarch, 1/2 teaspoon sugar, salt, and flank steak in a medium bowl; toss to coat. Set aside.

Combine 2 teaspoons cornstarch, 1/2 teaspoon sugar, broth, soy sauce, and black pepper, stirring with a whisk until sugar dissolves; set aside.

Heat oil in a wok or large nonstick skillet over medium-high heat. Add the green onions, ginger, and garlic; stir-fry 10 seconds. Add beef mixture; stir-fry 3 minutes or until done. Remove the beef mixture from pan; cover and keep warm. Add peas and bell peppers to pan; stir-fry 4 minutes or until crisp-tender. Add beef and broth mixture to pan; cook 2 minutes or until thickened, stirring constantly.

Source: Cooking Light

One Year Ago:  Oatmeal Caramelites

Sunday, April 17, 2011

Easter Dinner Plan

Appetizers: Roasted Red Pepper Hummus with Pita Chips & Veggies, 4-Pepper Deviled Eggs, Mexican Dip & Tortilla Chips

Main Meal: Twice Baked Potatoes, Layered Salad, Cola-Pinneapple Glazed Ham, Dinner Rolls, Orange Glazed Carrots

Dessert: Eclair Cake & Peanut Butter Bars

Drinks: Strawberry Bellini, alcoholic & non-alcoholic versions & other assorted beverages

One Year Ago:  Lucky Green Velvet Cupcakes

Menu Plan Monday

Monday: Mouthwatering Beef Dip Sandwiches


Tuesday: Mexican Chicken Corn Chowder (Aunt Cyndee's recipe)

Wednesday:  Mini Meat Loaves, Mashed Potatoes, Veggie

Thursday: Baked ScallopsOlive Oil & Garlic Pasta, & Veggie

Friday: Leftovers

Saturday: My Very Favorite Pizza Crust with Assorted Toppings

Sunday: Easter Sunday

One Year Ago:  PW's BBQ Meatballs

Monday, April 11, 2011

Spaghetti Sauce

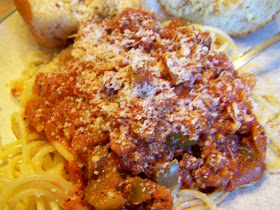
My kids all just LOVE spaghetti, especially my oldest.  They don't seem to like spaghetti and meatball as much, they seem to want something more closely resembling Prego or Ragu.  I think I have finally found a homemade sauce that my entire family enjoys.  Another plus is that it seems to stretch a pound of ground beef farther than the jar of Ragu does and it sneaks in lots more veggies:-)


Spaghetti & Lasagna Sauce

1 (28 ounce) can stewed tomatoes
1 (28 ounce) can crushed tomatoes
1 pound lean ground beef
2 yellow onions (or 1 large), chopped
2 green bell peppers, chopped 
5 cloves garlic, chopped
2 tablespoons white sugar
1 tablespoon dried basil
1/2 teaspoon dried oregano
salt and pepper to taste


Blend the stewed tomatoes and crushed tomatoes in a blender. 

In a stock pot or large kettle, brown the ground beef with the onions, peppers, garlic. Pour in tomatoes, and reduce heat. Add sugar, basil and oregano, and simmer about 40-60 minutes, until thickened. Season with salt and pepper before serving.

Source: allrecipes

One Year Ago:  No Peek Beef Tips


Sunday, April 10, 2011

Menu Plan Monday

Monday 11th:  Chili Rubbed Pork with Apricot Glaze, Rice, Veggie

Tuesday 12th:  Three Pepper Beef, Rice, & Egg Rolls with Sweet & Sour Sauce


Wednesday 13th:  Baked Coconut Shrimp, Potatoes, & Side Salad

Thursday 14th:  Leftovers


Saturday 16th:  Chicken MakhaniNaan, Basmati Rice


Monday, April 4, 2011

Strawberry Shortcake Cake

Today, my daughter and I holed up in the kitchen and whipped up some comfort food.  For dinner, we had Cheesebuttons, a family tradition.  For dessert we had this Strawberry Shortcake Cake, per request of Grace.  It was very good even though I did mess up the recipe a bit!  I divided the batter between 2 round cake pans instead of putting all the batter in one, then cutting it in half like the recipe states.  The reason you need to have those cut halves is that the inside serves as a wonderful "sponge" for the strawberries in their juices.  I knew mine wouldn't absorb the sauce right, so we spooned it over the top.  Still delicious, but I am looking forward to giving it another go!

Frosting Ingredients:


Cake Ingredients (salt is hiding behind the cute blonde;)

Delicious!


Cake
1-½ cup Flour
3 Tablespoons Corn Starch
½ teaspoons Salt
1 teaspoon Baking Soda
9 Tablespoons Unsalted Butter, Softened
1-½ cup Sugar
3 whole Large Eggs
½ cups Sour Cream, Room Temperature
1 teaspoon Vanilla
_____
Icing
½ pounds Cream Cheese, Room Temperature
2 sticks Unsalted Butter
1-½ pound Powdered Sugar, Sifted
1 teaspoon Vanilla
1 pound Strawberries
Preparation Instructions

IMPORTANT: Be sure to use a cake pan that’s at least 2 inches deep! Before baking, the batter should not fill the pan more than halfway.

Sift together flour, salt, baking soda, and corn starch.
Cream 9 tablespoons butter with the sugar until light and fluffy. Add eggs one at a time, mixing well each time. Add sour cream and vanilla and mix until combined. Add sifted dry ingredients and mix on low speed until just barely combined.

Pour into greased and floured 8-inch cake pan. Bake at 350 degrees for 45 to 50 minutes, or until no longer jiggly like my bottom. Remove from cake pan as soon as you pull it out of the oven, and place on a cooling rack and allow it to cool completely.

Stem strawberries and slice them in half from bottom to top. Place into a bowl and sprinkle with 3 tablespoons sugar. Stir together and let sit for 30 minutes. After 30 minutes, mash the strawberries in two batches. Sprinkle each half with 1 tablespoons sugar and allow to sit for another 30 minutes.

Make icing: combine cream cheese, 2 sticks butter, sifted powdered sugar, vanilla, and dash of salt in a mixing bowl. Mix until very light and fluffy.

Slice cake in half through the middle. Spread strawberries evenly over each half (cut side up), pouring on all the juices. Place cake halves into the freezer for five minutes, just to make icing easier.

Remove from freezer. Use a little less than 1/3 of the icing to spread over the top of the strawberries on the bottom layer. Place the second layer on top. Add half of the remaining icing to the top spreading evenly, then spread the remaining 1/3 cup around the sides.

Leave plain OR garnish with strawberry halves.

IMPORTANT: Cake is best when served slightly cool. The butter content in the icing will cause it to soften at room temperature. For best results, store in the fridge!